I finished one of the projects that has been lingering for a month or two now. I made escort card boxes and escort card shutters. The boxes can each hold 90 cards and the shutters can hold another 60. If we have 300 guests, there will be another 60 cards or so that will have to be set on the table in rows between the boxes.
The most tedious part of this project was spray painting the boxes and shutters black. We got the shutters for $4 from the Re-Store, but they were ivory to begin with. I found the boxes at Good Will, but they started their life as brown cassette tape holders. After the painting ordeal was completed, it was only a matter of adhering the different ribbons to the holders!
One of my last big projects left to do is make up the wedding programs. However, I can't make them until I have good guest-imate (haha, get it? instead of guesstimate?!) of the number of people who will be attending. So far of the nearly 325 people we have invited in the first round of invitations, only 110 people have responded that they are coming and 48 have sent in a "no" rsvp. I hope the rest of the bunch respond quickly; there is less than two weeks left until the rsvp deadline!
74 days. 10.5 weeks. The wedding is quickly approaching! My wedding to-do list is definitely shortening, and now the bulk of the items left on it must be completed when I am home in June or immediately before the wedding.
The invitations will be mailed out on Saturday from Bridal Veil, Oregon! Look for them coming soon to a mailbox near you. :)
Tonight I worked on a framed wedding agenda and menu board. The agenda describes the order and timeline of events for the evening. The menu board spells out the food and dessert choices.
The frames measure about 2.5' tall. Here they are pictured leaning against my cupboards.
I bought the frames for these projects at Goodwill and painted them each silver. I used the large format printers at Kinkos to print the agenda and menu I had created. If you have never used large format printing, you should try it. It is very cheap (printing each of these cost less than $4). They warn you before printing the quality may not be very good, but the quality of print is just fine in my opinion. I then adhered the prints to foam board from the dollar store using scotch tape. I probably spent around $15 for the entire project.
While printing the menu and agenda at FedEx Kinkos this past weekend, I also printed out a large black and white congratulations poster and engagement picture, each measuring 3 feet by 4 feet. These will be used to cover up some wooden white board cupboards in our reception venue. The engagement picture turned out so nice that I may blow up some more engagement or wedding photos to decorate our home after the wedding!
Today's excitement: I got 250 business cards in the mail which instruct guests how to upload their photos to a Flickr website to share them with us. On the back, I am going to put a label with our new address once Lee and I find a new place to live. I am very happy with how they turned out! Vistaprint does their job well!
I can't wait to see the pictures people take on our wedding day!
I have been working on some fun puzzles for the wedding! I want to make sure the guests have some small thing to entertain them while waiting, so I have made a couple of puzzles and fun games for the guests.
I made a crossword puzzle, a digital camera "I Spy," and a wedding mad libs. My favorite is the crossword puzzle. I took a picture of the one I printed out and solved:
Oops, I forgot to fill in one of the answers!
One puzzle/game will be placed at each person's spot at the reception, and I will print out a few extras in case people would like to try their hand at more than one. I hope the guests enjoy completing their puzzles while waiting for their food!
Lee visited Salem this weekend, and we were able to complete a few wedding projects.
For our ceremony, we made decisions on songs and readings. The parents, grandparents, and bridal party will be walking down the aisle Air on the G String by Bach.
I will be walking down the aisle to this version of the wedding march:
This song will be our special music during the lighting of the unity candles:
And we will be walking up the aisle as a married couple to this song!
My brother will be doing our readings. Here are the readings from the Bible we have chosen:
Jeremiah 29:11-13
For I know the plans I have for you,” declares the LORD,
“plans to
prosper you and not to harm you, plans to give you hope and a future.
Then you will call on me and come and pray to me, and I will listen to you.
You will seek me and find me when you seek me with all your heart."
1 Corinthians 13:1-8
If I speak in the tongues of men or of angels,
but do not have love, I am only a resounding gong or a clanging cymbal.
If I have the gift of prophecy and can fathom all mysteries and all
knowledge, and if I have a faith that can move mountains,
but do not
have love, I am nothing.
If I give all I possess to the poor and give over my body to hardship that I may boast,
but do not have love, I gain nothing.
Love is patient, love is kind.
It does not envy, it does not boast, it is not proud.
It does not dishonor others, it is not self-seeking, it is not easily angered, it keeps no record of wrongs.
Love does not delight in evil but rejoices with the truth.
It always protects, always trusts, always hopes, always perseveres.
Love never fails.
A couple of other fun things. I got Lee's pocket square in the mail this weekend. They did not have pocket square in our color at Mens Wearhouse, so I had to order online. I ended up getting a good deal; the pocket square, with shipping, was under $10!
Lee will wear this in his tuxedo's pocket
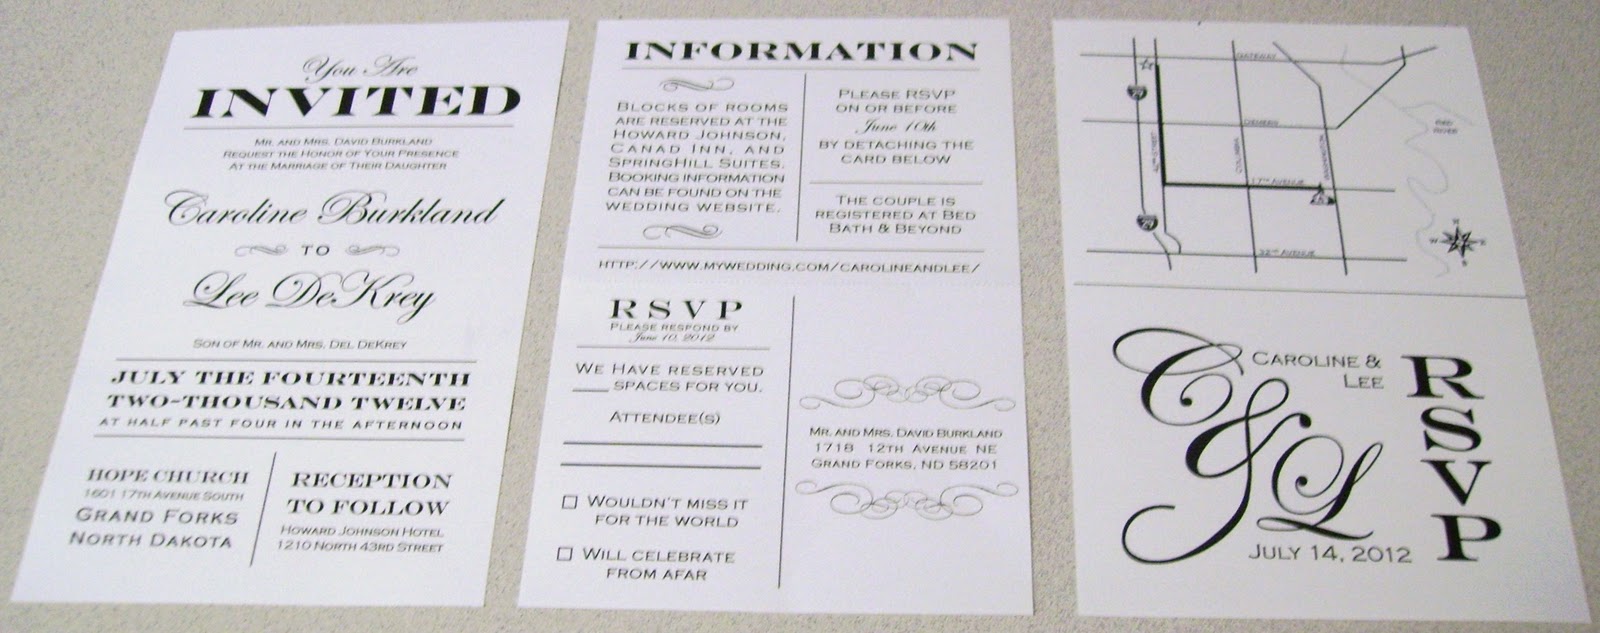
I also was able to work on the wedding invitation suite, since I am designing my own. This picture is kind of blurry, but you can get the general idea. There will be two pages sent with our invite. The first will be the invitation and the second will be the information and a detachable RSVP postcard. The third page you see is the back side of the information/RSVP postcard. To RSVP, guests will detach the pre-stamped bottom portion of the second page on a perforated line.
We are going to print the invites on white or cream shimmer paper. I would like to either tie something around the 2 pages or put a belly band around them to keep them together. The tie or band could be turquoise to introduce our color scheme.
Here is one last wedding project we started but did not finish this weekend: escort cards. We are going to be making wax seals to put on each escort card. Lee's mom does calligraphy, and we are going to have her write them out for us. Here is our inspiration and our tester card:
Inspiration
This seal has wedding bells, but we also bought a wax stamp with hearts
We didn't use real wax to make our version. We used hot glue, a wax stamp, and silver spray paint to achieve the same effect. We found the cards at the dollar store in packs of 50 for 25 cents a piece. The back of a card will have a printed off sticker designating which tables the person can sit at. We will not be having individual seating place cards, but these will serve as a guideline so family can sit closer to the head table.
Lots of to-do list items were conquered this weekend! I love crossing things off my list.
I have been looking online for toss garter ideas for awhile now. I wanted something simple and narrower than my actual garter. I wanted the real garter and the toss garter to match somewhat, and I also wanted to incorporate my "something blue" if possible.
My inspiration for a basic toss garter
Last night, I was cruising through the dollar store to pick up a few things when I spotted the perfect item to use for my toss garter. It looks like many of the toss garters I have seen online as part of bridal garter sets. Of course I had to add my own little DIY touch to it by including a turquoise blue hand-stitched label on the inside.
The front of the toss garter
Hand-stitched turquoise label made from a ribbon scrap and glued to the inside with fabric glue
The complete garter set together. They match pretty well!
I didn't want you to judge, so I saved this piece of information for last: guess what I used for my toss garter? A baby headband! The baby headband even came with two little matching hair clips. Surprisingly, it fits my leg perfectly. For the two garters together, I have spent around $5. I love being a frugal bride.
Here's the newest project! I made signs for the back of the bride and groom's chairs for the reception.
Bride sign hanging on the back of a chair
The two finished signs
For this craft, I bought clearance wood plates for a few dollars a piece from Michaels. I covered each plate with white acrylic paint. I then used the printer ink transfer technique described here to apply the letters. I painted the words "bride" and "groom" turquoise, but I left the monogram and date as is. I used leftover silver roping (remnants from my card box project, but originally from the Dollar Tree's Christmas section) to attach the plaques to the chairs.
My only regrets on this project are that I didn't perfectly straighten the writing so it matches up with the points of the plaques and the turquoise lettering isn't perfect due to having a big paintbrush and shaky hands. Oh well. Not too many people will be looking at the backs of our chairs at the reception. Honestly, this project is probably only going to be good for one or two pictures, but it's a fun wedding craft I wanted to complete. Also, when playing around with it, I found as long as the writing is parallel
with the floor, you don't really notice the crookedness. What do you think?
Another DIY project! This one was a quick one. I didn't really care to spend too much time making the unity candle for the ceremony, and I think going the simple route worked well anyway. All this project took was a Walmart candle, leftover ribbon, my computer/printer/paper, and scotch tape. Tah dah!
You will notice I "tested" the candle. I wanted to make sure the wick would light on the big day! I've never heard any bad luck stories about pre-lit unity candles, but I have heard funny stories of unity candles that would not light!
A quick project! I got all of the supplies this weekend, and I just finished the project tonight. This has also been one of my favorite projects to work on. The pictures make the card box look deceivingly small, so I included our framed guestbook instructions (which are 8"x10") in the second photo.
The photo doesn't show it well, but the turquoise lids of the top and bottom tiers are sparkly!
A decision has been reached! Since the prices were very comparable, I decided to go with TWO save the date designs. Younger wedding guests (my friends and Lee's friends) will receive the black and white artsy save the date, and parents' friends will receive a more traditional pose on their save the dates. Everyone's happy, especially me. :)
Best of all? My only expense is printing the postcards, since I designed the postcard by myself and the e-pics were complimentary from our photographer. The total price per postcard to print is 24 cents. Postage for each will be 29 cents, making this one budget-friendly project!
This project has taken awhile for me to attempt. I found the materials several weeks ago, but I was too busy with save the dates to try it out. I finally found the motivation tonight while watching Glee.
If you buy these on Etsy, they are usually around $20. I used $4 wooden hangers from Ikea and $3 wire from Walmart. I also used a small amount of ribbon left over from other projects. Now I have a great personalized hanger to showcase my dress for a few pictures on my wedding day!
I never have done this before, but I started a poll on the wedding website Wedding Bee, which is a open forum for brides. I was getting conflicting advice from my parents and Lee's parents on which save the date picture to use, so I thought I would pose the question to total strangers to see what they think! Check it out to see what the results are!
I have been working on options for save the date postcards, and I need your help! Below are some of the save the dates I have created. Here are my questions for you!
1) Which is your favorite front design? Keep in mind the picture can be changed. Also, the colors can be modified as well.
2) Which is your favorite back design? The back will be printed in black and white. Again, keep in mind the picture can be changed.
3) Out of the featured pictures, which is your favorite picture for the save the dates? If there is a different picture from our engagement photo shoot that you think would also work, let me know!
Awhile back, I mentioned I had been working on my wedding flowers. I took a short break from making them, but I am happy to report I have finally finished all of the flowers!
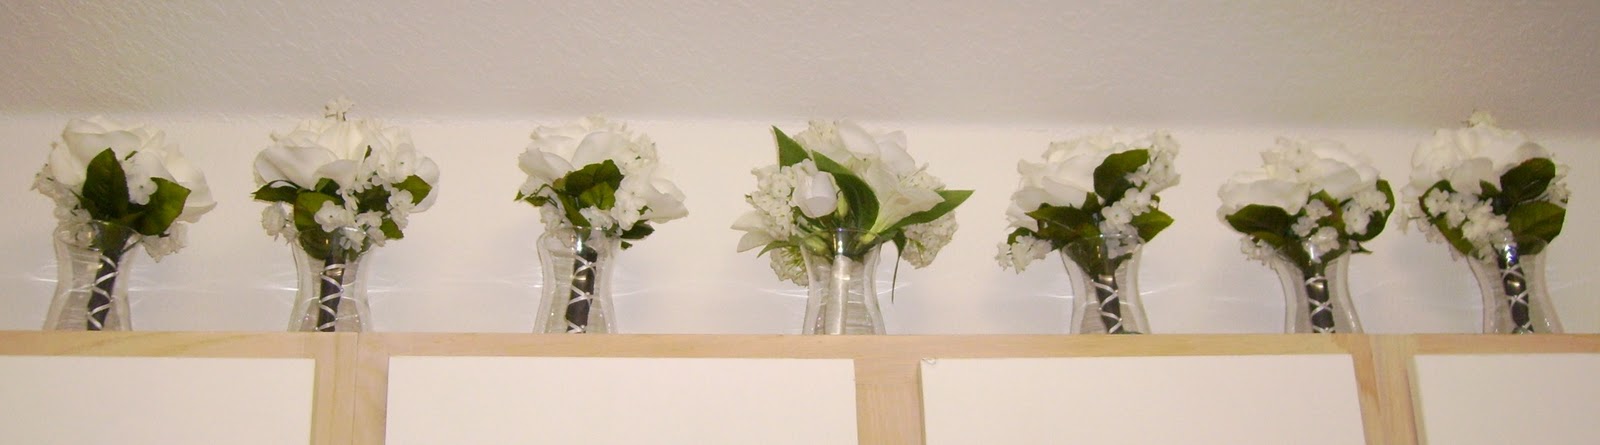
I made 6 bridesmaid bouquets and a toss bouquet for the reception. Here is a picture of all of the bouquets lined up above my cabinents:
I also made the boutonnieres and corsages. I used turquoise ribbon to wrap the stems of the boutonnieres and corsages. However, for parents and grandparents, I used white ribbon. Overall, I kept them pretty simple. You can see examples of both below.
Recently I have worked on a couple of paper products for the wedding. First, I worked on a guestbook instruction sheet which will be framed and placed by the guestbook. It includes our monogram and the fonts that I will use on the rest of our formal paper products, such as menus and programs.
I also made a fun, playful I Spy worksheet so people have something to do during the reception! Also, this will ensure that people take pictures (and hopefully post them to facebook) of our wedding reception. I found this idea on Pinterest.
Last night, Lee and I were able to pick up the remaining silk flowers I need to make the bouquets! Since I'm in Portland for the weekend, I couldn't finish the bouquets just yet. Instead, I decided to try my hand at designing a map of Grand Forks to include with our invitations. It's nice to have Lee around to provide feedback on what looks good. :) But I would like to have your feedback too! Is there anything else needed on the map below?
The red route shows the easiest route (with the fewest turns) to take from the church to the reception. As you can see, there are many ways to get to the reception, though! Also, this route takes everyone past the three hotels we have made group reservations at. That way, anyone who needs to stop at the hotel between the ceremony and the reception will be able to.
It was quite simple to make the map. I Google-Mapped Grand Forks and took a screen shot of the area I wanted to feature. I then took a screen shot of the map, pasted the shot in to Microsoft Paint, cropped the image, and saved it as a jpeg. I then opened the image in Microsoft Word. I drew lines over the major roads and landmarks in the appropriate colors and labelled them with text boxes, clip art, and images from online.
To finish it all off, I deleted the original Google Maps image from the background. I then took another screen shot of the Word Document, cropped the image again Paint, and saved the image you see above as a jpeg. I love computers.
I'm not sure what will be next on the DIY agenda. I feel like I have been going full speed ahead on these projects and may need to slow it down for a little bit. I don't want to run out of projects to do! :)